 YardBuildPlans
DIY garage shelves plans: 2x4 shelving unit (free PDF)
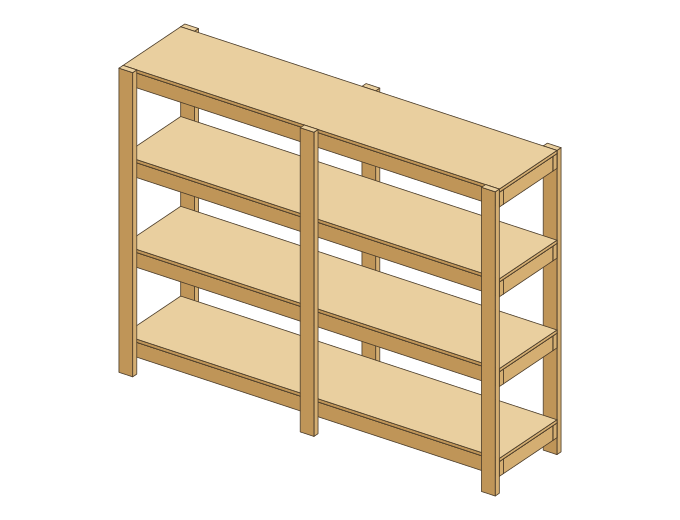
Plain, heavy-duty garage shelves you can build in a day from 2x4 studs and plywood: four 2x4 shelf frames, 2x4 legs screwed to every frame, and a 3/4 inch plywood deck on each shelf. Pick a width and a height and download the free plan. Every drawing, cut length and step is worked out for that size.
- Size
- 96" wide × 24" deep × 6 ft tall
- Shelves
- 4, each 21" × 96" (56 sq ft in all), 17" clear between
- Legs
- 6 2x4s, with a middle pair
- Lumber
- 16 × 2x4 x 8 ft studs (118 ft of cuts)
- Plywood
- 2 × 3/4" plywood (4×8)
- Build steps
- 7 in the free plan, 11 in premium
Premium edition (17 pages, $19.99) adds the cut list, cutting diagrams, plywood layout and shopping list.
Elevations
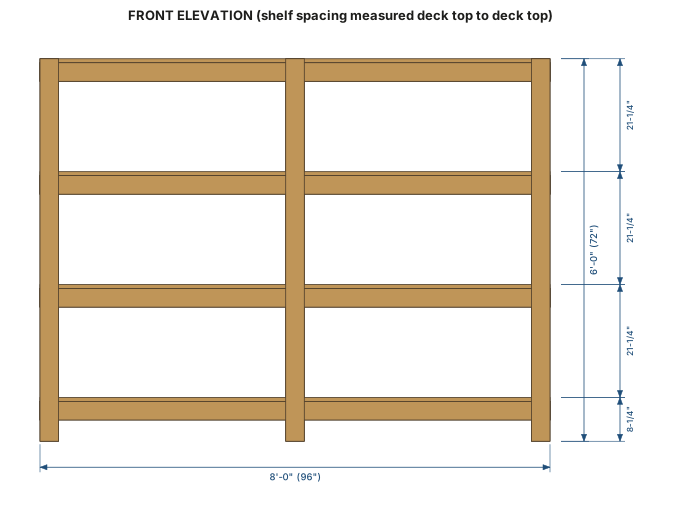
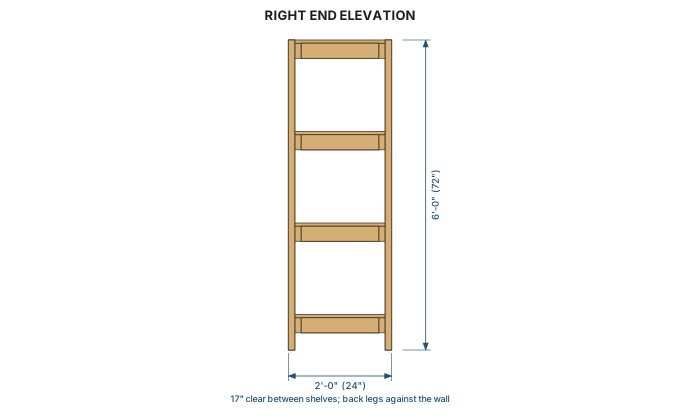
Shown for the 8 ft wide x 6 ft tall size. The free PDF also has the shelf-frame plan with every leg position, for every size.
What the build looks like
- Step 1. Cut the parts
- Step 2. Build the shelf frames
- Step 3. Mark the legs
- Step 4. Fit the back legs
- Step 5. Fit the front legs
- Step 6. Stand it up and fit the shelf decks
- Step 7. Anchor it to the wall
The free PDF has these steps in full with a 3-D figure for each. Skill level: beginner. You need a circular saw (or a miter saw for the 2x4s), a drill/driver, a square, a stud finder and a helper to stand the unit up. Every cut is square: no angles, notches or joinery.
Why this design
- Only 8 ft studs. Every 2x4 part fits an 8 ft stud. The 4 ft unit is 47-7/8 inches wide so two rails come out of one stud with a saw kerf between them: at a full 48 inches every rail would need its own stud (10 studs instead of 12 for the 8 ft tall unit).
- Legs on the outside. The 2x4 legs lie flat against the front and back of every shelf frame, three screws at each crossing, never more than 48 inches apart. The 6 and 8 ft units get a middle pair.
- No notches in the shelves. Each plywood deck is a plain 21 inch rip that drops in between the front and back legs. Two decks come out of a 4 ft wide sheet side by side.
- Anchored, not just stood up.The last free step screws the top back rail into the wall studs, so a loaded unit can't tip forward.
Pair it with our 2x4 workbench plans: the same studs, plywood and tools. Out of room in the garage? The shed plans add storage outside.
Free vs premium
| Included | Free | Premium |
|---|---|---|
| 3-D overview, front and end elevations with every shelf height dimensioned | ✓ | ✓ |
| Shelf-frame plan with every leg position | ✓ | ✓ |
| Build steps with every cut length written in, and a 3-D figure for each step | ✓ | ✓ |
| Wall-anchoring step | ✓ | ✓ |
| Exploded view with every part labelled | — | ✓ |
| Full cut list (every part, quantity and length) | — | ✓ |
| Board-by-board cutting diagram for 8 ft studs | — | ✓ |
| 4×8 plywood layout for the shelf decks | — | ✓ |
| Shopping list with screw counts by size | — | ✓ |
| Extra steps: loading, add-ons (tote rails, hooks, pegboard), finish and care | — | ✓ |
Questions
- What size garage shelves should I build?
- Eight feet wide gives the most storage per wall and uses full-length studs and plywood with almost no waste on the rails. Six feet fits between a door and a corner in most garages. Four feet suits a narrow wall or the end of a workbench, and its four shelves come out of a single sheet of plywood. All six sizes are 24 inches deep, deep enough for storage totes and paint cans.
- How far apart should the shelves be?
- The 6 ft tall unit has 17 inches clear between shelves and the 8 ft tall unit has 25 inches. The bottom shelf sits 8.25 inches off the floor so you can sweep under it and it stays clear of puddles. Measure your tallest bins with the lids on before you mark the legs: one of the build steps shows where to move the marks for a taller gap.
- What lumber do I need?
- Standard 2x4 studs, all 8 ft long (the 8 ft wide, 6 ft tall unit uses 16 of them) and 3/4 inch plywood for the shelves (2 sheets for the 8 ft unit, one for the 4 ft unit). Pick the straightest studs in the pile. Any sheathing-grade plywood works for the shelves; a sanded face is nicer if you plan to paint them.
- How much weight can these shelves hold?
- We don't publish a weight rating. This is a practical DIY shelving unit, not an engineered structure. Legs are never more than 48 inches apart, every shelf frame is screwed to every leg with three screws, and the plywood spans only 21 inches front to back. Keep the heaviest things on the bottom two shelves, spread loads along a shelf, and always screw the unit to the wall studs.
- Do I have to anchor the shelves to the wall?
- Yes. A tall, loaded shelving unit can tip forward, especially if someone pulls on a top shelf. The free plan has a step for it: two long screws through the top back rail into every wall stud the unit crosses, or concrete screws on a block wall. Do it before you load anything.
Not engineered. Check local codes, permits and loads. Build at your own risk. Anchor the unit to the wall before loading it. Wear eye and hearing protection when cutting, and pre-drill near board ends. Full disclaimer.