 YardBuildPlans
Workbench plans: simple 2x4 garage workbench (free PDF)
A sturdy, plain workbench you can build in an afternoon from 2x4 studs and plywood: a flat top on a 2x4 frame, L-shaped corner legs and a full-length shelf near the floor. Pick a length and depth and download the free plan. Every drawing, cut length and step is worked out for that size.
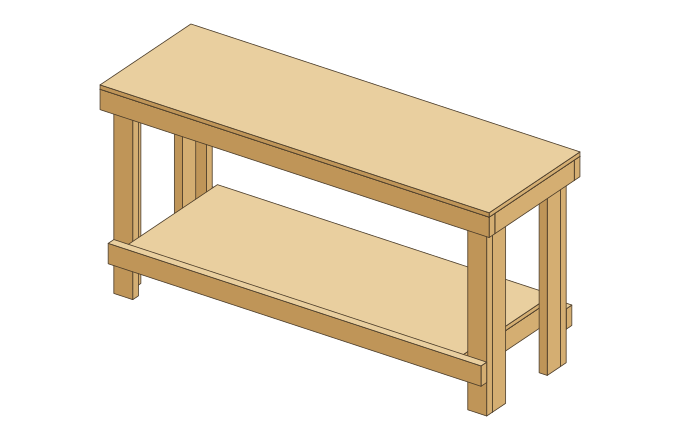
- Top
- 6 ft × 24 in, 36" high (12 sq ft)
- Shelf
- 10" off the floor, 10.3 sq ft, 21.75" clear above it
- Legs
- 4: L-shaped 2x4 corner legs
- Lumber
- 8 × 2x4 x 8 ft studs (57.5 ft of cuts)
- Plywood
- 1 × 3/4" plywood (4×8): top and shelf from one sheet
- Build steps
- 7 in the free plan, 11 in premium
Premium edition (16 pages, $19.99) adds the cut list, cutting diagrams, plywood layout and shopping list.
Elevations
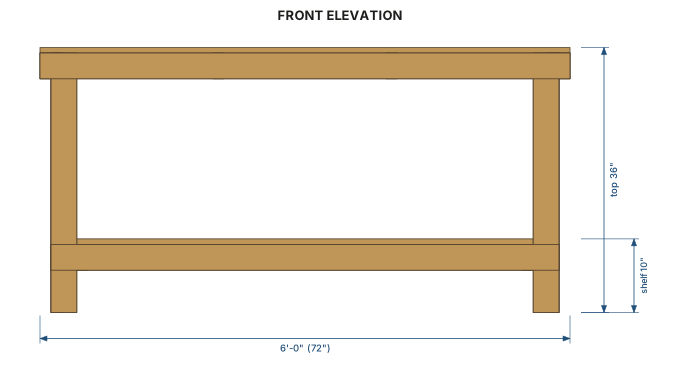
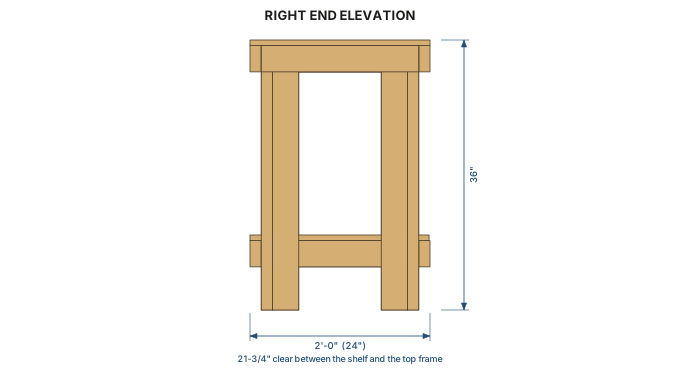
Shown for the 6 ft x 24 in size. The free PDF also has the top-frame and shelf-frame plans for every size.
What the build looks like
- Step 1. Cut the parts
- Step 2. Build the top frame
- Step 3. Make the corner legs
- Step 4. Fit the legs
- Step 5. Fit the shelf frame
- Step 6. Stand it up and fit the shelf
- Step 7. Fit the top
The free PDF has these steps in full with a 3-D figure for each. Skill level: beginner. You need a circular saw (or a miter saw for the 2x4s), a drill/driver, a square and two clamps. Every cut is square: no angles, notches or joinery.
Why this design
- Only 8 ft studs. Every 2x4 part fits an 8 ft stud, the cheapest board per foot at most stores and one that fits in a car with the seats down.
- One sheet of plywoodcovers the top and the shelf on the 24 inch deep benches. The shelf is cut 1/8" shallower than the top so both pieces rip from the same sheet with a saw blade between them.
- L-shaped corner legs. Each corner leg is two 2x4s glued and screwed together, so the top frame bears on the legs instead of hanging on screws, and the bench resists racking both ways.
- No notches in the shelf. The shelf panels drop in between the legs, so you cut plain rectangles. The 8 ft bench has a pair of middle legs and a two-piece shelf.
Building something for the garden instead? Our raised garden bed plans use the same lumber and tools, and the shed plans give the bench a home.
Free vs premium
| Included | Free | Premium |
|---|---|---|
| 3-D overview, front and end elevations with dimensions | ✓ | ✓ |
| Top-frame and shelf-frame plans with every rail position | ✓ | ✓ |
| Build steps with every cut length written in, and a 3-D figure for each step | ✓ | ✓ |
| Exploded view with every part labelled | — | ✓ |
| Full cut list (every part, quantity and length) | — | ✓ |
| Board-by-board cutting diagram for 8 ft studs | — | ✓ |
| 4×8 plywood layout for the top and shelf | — | ✓ |
| Shopping list with screw counts by size | — | ✓ |
| Extra steps: setting the height for you, add-ons, finish and care | — | ✓ |
Questions
- What size workbench should I build?
- Six feet long by 24 inches deep fits most one-car garages and leaves room to walk past. Eight feet gives you room to lay out a full-length board or a door, and the 8 ft size gets a pair of middle legs. Four feet suits a small shop, a basement corner or a potting bench. Go 30 inches deep if the bench stands against a wall and holds big work like cabinet doors. A 24 inch top is easier to reach across, and a 24 inch top and shelf come out of one sheet of plywood.
- How tall should a workbench be?
- These plans are drawn at 36 inches, the same as a kitchen counter. That is a good height for assembly, sanding and most power tools for a person of average height. For lots of hand planing, a bench at about wrist height with your arms hanging down works better. The premium plan has a step on fitting the height to you. To change it, cut the same amount off every leg, or raise it with blocks or adjustable feet.
- What lumber do I need?
- Standard 2x4 studs (the 6 ft x 24 in bench uses 8 of them, all 8 ft long) and 3/4 inch plywood for the top and the shelf. Pick the straightest boards in the pile, and buy one spare. Any sheet grade works. A smooth sanded face on top is nicer to work on, and a cheaper sheathing grade is fine for the shelf.
- How much weight can it hold?
- We don't publish a weight rating. This is a practical DIY bench, not an engineered structure. The legs stand under the top frame at every corner, and the top is supported every 24 inches or less. Keep heavy things like a tool chest or a bench grinder over the legs or on the lower shelf, and never stand on the bench.
- Can I add a vise, pegboard or casters?
- Yes. A front vise mounts under the top at the left end, a pegboard hangs from a cleat on the back legs, and a power strip fits under the front rail. The premium plan has notes on each. Locking casters can go under the legs, but they raise the top by their height, so shorten the legs to match. Add-ons are not in the cut list.
Not engineered. Check local codes, permits and loads. Build at your own risk. Wear eye and hearing protection when cutting, and pre-drill near board ends. Full disclaimer.